Securing SFMC with JWT
Continuing with building a custom activity within Salesforce Marketing Cloud (SFMC) Journey Builder, this post focuses on steps required to secure information between SFMC and our custom service. This will be used to secure the data being sent to the /execute endpoint as the payload would include sensitive information.
Steps
1 - Create a SALT
For this step, I used Google’s Bard service.
Generate a random set of x characters
Using that response, I provided the value to retrieve its hexadecimal equivalent:
Convert string “earlier_response_string” in hexadecimal
Bard responds with the value in upper-case. SFMC documentation states that the SALT must be stored in lower-case. This was done via a quick Python str.lower() method call.
2 - Add the SALT
This step adds the generated, lower-case hexadecimal SALT to SFMC. This allows SFMC to encrypt the payload using that shared SALT key.
- Login to SFMC
- Under your login (upper right), navigate to Settings > Setup
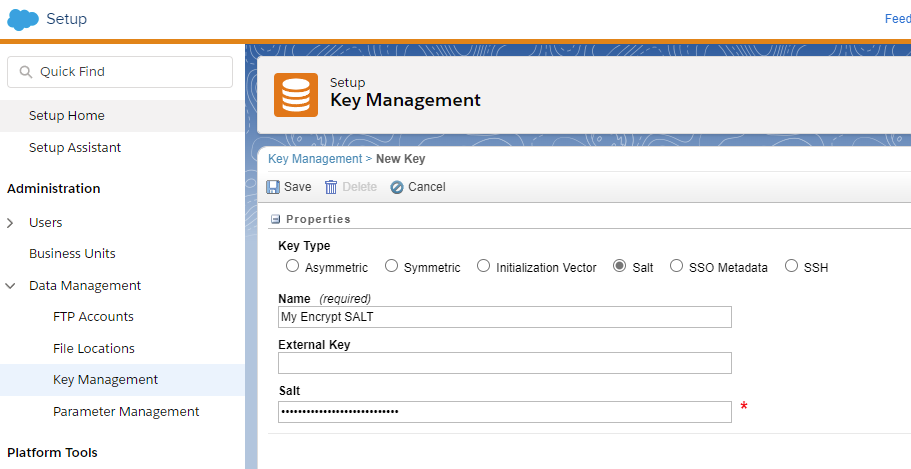
- Once in the setup area, navigate to Administration > Data Management > Key Management

Per the above:
- A key name was defined
SALTwas specified as the key type- lower-case hexadecimal value was provided for the Salt value (currently masked)
Upon saving, an external key is generated. For example: 3187c870-034e-4a41-a578-4660b495e215
3 - Requesting JWT
For this step, we are modifying the config.json of our custom activity. As our focus was on the /execute endpoint, the file is configured as follows:
1
2
3
4
5
6
7
8
9
10
11
12
13
14
15
16
17
18
19
 ...
 "arguments": {
    "execute": {
        "inArguments": [

        ],
        "outArguments": [],
        "url": "https://some-cool-site.com/execute",
        "timeout": 10000,
        "retryCount": 3,
        "retryDelay": 1000,
        "concurrentRequests": 5,
        "format": "JSON",
        "useJwt": true,
        "customerKey": "3187c870-034e-4a41-a578-4660b495e215"
    },

    ...
 }
With the above, we are requesting that SFMC:
- use JWT via
useJwt:true - use the SALT added previously (and stored under the external key value:
3187c870-034e-4a41-a578-4660b495e215) be utilized for the encryption. This is specified by thecustomerKeykey.
4 - Supporting JWT
Finally, a few code changes to the express app responsible for serving our custom activity.
- Add support for
application/jwtThis is done via the following snippet:1 2 3 4 5
const app = express(); app.use(require('body-parser').raw({ type: 'application/jwt' }));
The result will allow express to accept requests with the header content-type: application/jwt.
5 - JWT Decryption
The final step is to decrypt the received value. The following snippet may be used here:
1
2
3
4
5
6
7
8
9
10
11
12
13
module.exports = (body, secret, cb) => {
        if (!body) {
                return cb(new Error('invalid jwtdata'));
        }

    if (!secret){
        return cb(new Error('missing decode secret'));
    }

    require('jsonwebtoken').verify(body.toString('utf8'), secret, {
            algorithm: 'HS256'
    }, cb);
};
For the above,
secretis the raw value (not the hexadecimal representation) used as the SALTbodyis the request body received by the/executeendpoint