Journey Builder: Custom Activity
I found myself recently diving into creating a custom activity in Journey Builder for Salesforce Marketing (SFMC). Not being a Javascript master by any means meant it was time to learn. I also found the documentation to be quite light with regards to specifics on this topic. Here’s my attempt to explain the learnings.
Background
 For those that aren’t familiar, Journey Builder allows one to define a marketing-oriented path for a contact to follow. Think of it was a decision tree based on known attributes and then, optionally, based on attributes/behaviors collected. Below is an example of a Journey Builder flow.
In this scenario, I’m creating a custom activity to initiate an API call. Eventually, this could be posting a message to a processing queue or an async call to Twilio to send an SMS message.
Architecture
Most of the SFDC documentation refers one to host their custom activity in Heroku. I’ve chosen to use Azure App Services instead. 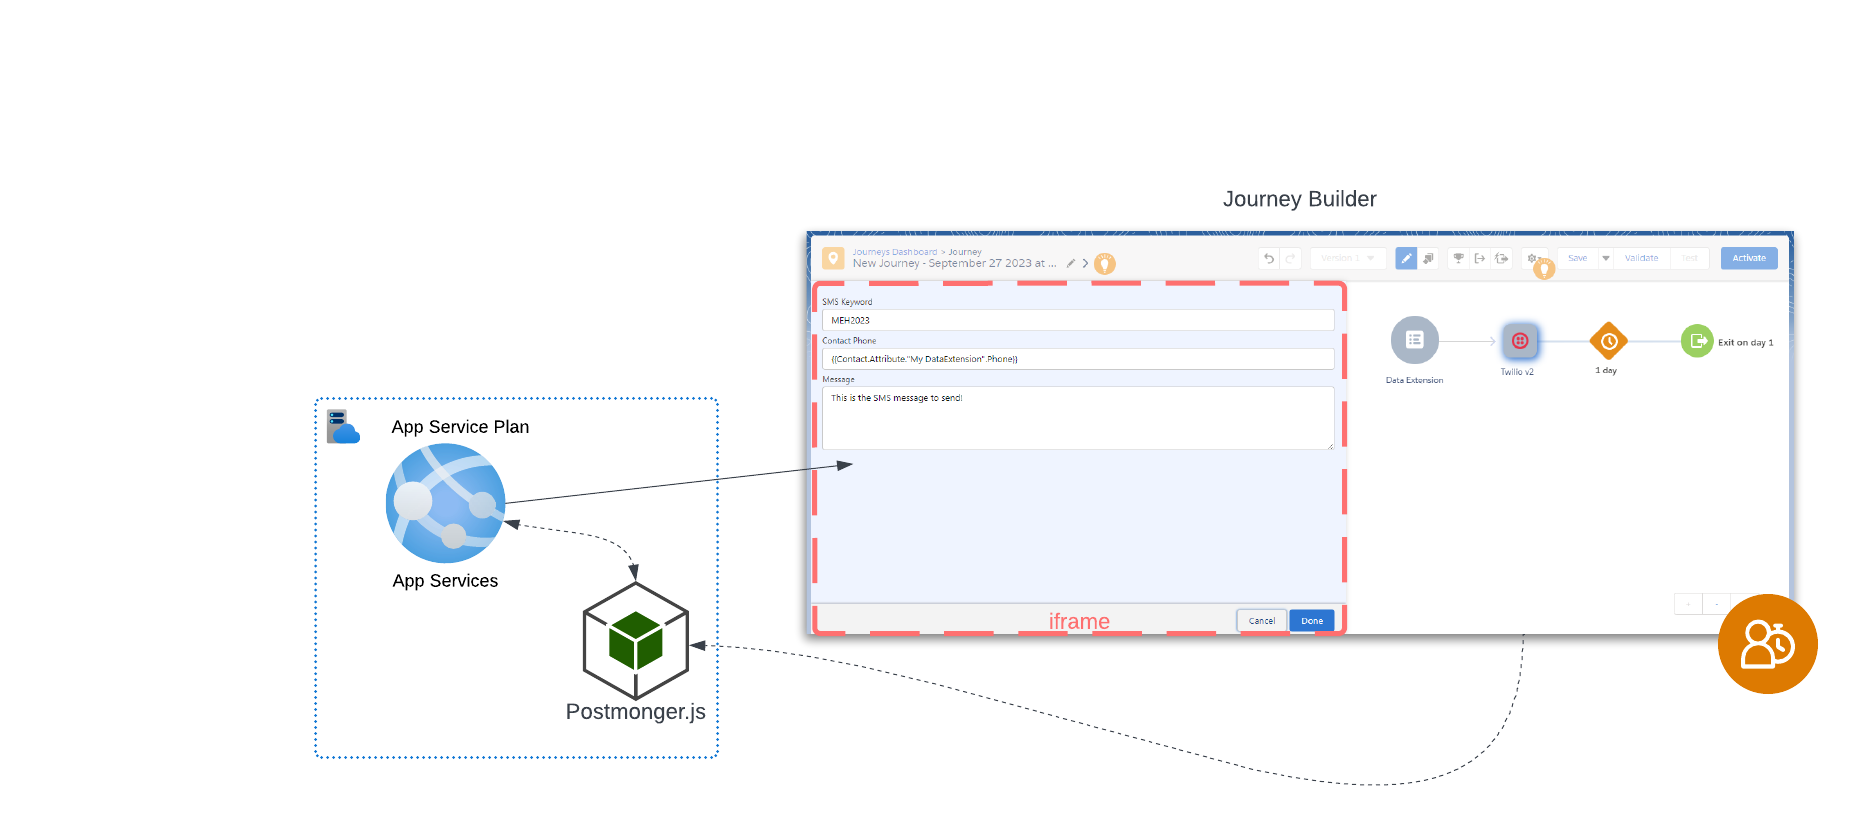 The architecture shown represents my current plan. Azure App Services will be responsible for hosting my Node.js Express app. This app is responsible for hosting the design time, which is embedded as an iFrame in Journey Builder. The app is also responsible for serving the required assets. This includes:
Postmonger.jsGenerically speaking, this provides the interface between Journey Builder and the iFrame. It includes event triggers that can then be listened for to trigger desired actions within the custom code.
config.jsonThis defines the integration that SFMC will subsequently use. It defines the endpoints that are eventually called and the in/out arguments passed.
The app also provides the necessary endpoints, which are referred to in the config.json artifact.
Getting Started
Initial Creation & Routes
The following will setup your initial environment.
1
2
3
4
mkdir custom-app
cd custom-app
npm init
npm install express
The above will setup your initial express environment. With that established, I followed the example provided by Salesforce on their Github.
The steps are loosely as follows:
- Create a sub-directory to compartmentalize the specific custom activity. This will allow the Azure App Service to host more than one custom activity in the future.
- Add the routes to the custom activity so that they can be served
Create directory structure.
1
2
3
4
5
6
7
mkdir routes
mkdir routes\twilio-sms
mkdir routes\twilio-sms\app
mkdir routes\twilio-sms\config
mkdir routes\twilio-sms\html
mkdir routes\twilio-sms\images
mkdir routes\twilio-sms\src
The root of my app is served by app.js as defined upon creation via the npm init command. To add my custom module, I added the following within:
1
2
3
4
5
6
7
8
const customModules = [
  require('./routes/twilio-sms/app/app')
];

//...then later...
customModules.forEach((cm)=> cm(app, {
  rootDirectory: __dirname,
}));
The above will load my module that is now directed to ./routes/twilio-sms/app/app.js. This is following a similar structure to the example code provided in the Salesforce Github repository referenced earlier.
First, create some initial routes to serve the required components.
1
2
3
4
5
6
7
8
9
10
11
12
13
14
15
16
17
18
19
20
21
22
23
24
const configJSON = require('../config/config-json')

module.exports = function twilioSmsActivity(app, options) {
    const activityDir = `${options.rootDirectory}/routes/twilio-sms`;

    //static resources
    app.use('/routes/twilio-sms/dist', express.static(`${activityDir}/dist`));
    app.use('/routes/twilio-sms/images', express.static(`${activityDir}/images`));

    // index redirect
    app.get('/routes/twilio-sms', function(req, res) {
        return res.redirect(`/routes/twilio-sms/index.html`);
    });

    // index.html route
    // example: https://gist.github.com/zPugMan/501fdd73c3e50e6ecf16d35766dbeffb
    app.get('/routes/twilio-sms/index.html', function(req,res) {
        return res.sendFile(`${activityDir}/html/index.html`);
    });

    // config.json route
    app.get('/routes/twilio-sms/config.json', function(req,res){
        return res.status(200).json(configJSON(req));
    });
The above snippet provides:
- routes for
index.htmlwhich will present the design time form presented in the iFrame of Journey Builder. - a route for
config.json, which defines the custom activity and provides all of the configuration values for it such as in/out arguments. - a route to
images, which will be used to serve the appropriate icon for the custom activity. - a route to
distdirectory is defined. This will be used to provide css and other static assets. The directory is formed via webpack and will be discussed later.
Configuration Settings: config.json
SFMC determines how to interact with a custom activity via a configuration file config.json. More information on the attributes that can be retrieved here.
Following a similar pattern, this file is defined via a module: /routes/twilio-sms/config/config-json.js.
1
2
3
4
5
6
7
8
9
10
11
module.exports = function configJSON(req) {
    return {
        workflowApiVersion: '1.1',
        metaData: {
          // the location of our icon file
          icon: 'images/twilio-icon.png',
          category: 'message'
        },
        // For Custom Activity this must say, "REST"
        type: 'REST',
...
Below are some key configuration items to consider in this file:
| Key | Sample Value | Purpose |
|---|---|---|
metadata.icon | 'images/twilio-icon.png' | Relative route to the icon that is ultimately displayed in Journey Builder’s available actions |
configurationArguments | Defines the URLs for the following actions: publish, validate, and stop. | |
arguments.execute.inArguments[] | { smsPhone: "" } | Defines one or more input arguments that are included in the payload POSTed to the /execute endpoint |
arguments.execute.outArguments[] | { status: "" } | Defines one or more output arguments that are returned in the response from the /execute endpoint |
Add API Endpoints
Returning to our custom activity module’s ./routes/twilio-sms/app/app.js code, the following snippet is repeated to add our necessary API endpoints.
1
2
3
4
5
app.post('/routes/twilio-sms/publish', function(req,res){
    console.log("Request to publish..");
    console.info('Publishing: ', JSON.stringify(req.body));
    return res.status(200).json({});
});
The endpoints required are:
/execute/save/publish/validate/stop
Validate
At this point, the express app created should have enough of the required components to run. Before we do, let’s add the package nodemon for dynamic updates while the app is running locally.
npm install nodemon --save-dev
Let’s add a purpose built dev script to our package.json file.
1
2
3
4
  "scripts": {
    "start": "node ./bin/www",
    "dev": "nodemon ./bin/www",
  }
Start up app via:
npm run dev
Validate the routes desired.
- http://localhost:3000/routes/twilio-sms redirects to
http://localhost:3000/routes/twilio-sms/index.html - http://localhost:3000/routes/twilio-sms/index.html serves the form used for configuration in the Journey Builder design time
- POST requests to the following respond with the hard-coded HTTP200 status
http://localhost:3000/routes/twilio-sms/savehttp://localhost:3000/routes/twilio-sms/validatehttp://localhost:3000/routes/twilio-sms/publishhttp://localhost:3000/routes/twilio-sms/stophttp://localhost:3000/routes/twilio-sms/execute